Backend Live Demo
This demonstration will introduce you to a whole new approach to bringing your backend functionality alive using Javascript and extending Magnolia’s new Javascript Models 2 module. If you’d like to learn more about the Backend Live extensions available to you, you can read more at the Backend Live - Extensions for Javascript Models 2 page.
We will be fulfilling a use case in this demonstration. You can follow along by checking out our start branch, or you can use the master branch with the complete use case’s completed code.
Setup
If you wish to use a pure frontend experience, continue reading the next section for the installation steps.
You will need the following installed prior to following this demo.
-
Java JDK 11+ (you can also install the GraalVM JDK)
If you wish to create your own custom backend-live components, if you wish to debug your Magnolia instance, or if you wish to do any other type of backend development, please jump to the Installation of Magnolia using Maven section then click `Click to expand!'.
Git the Code
First thing to do is to grab our demonstration code. Using git you can just check out the project by running:
git clone https://git.magnolia-cms.com/scm/light-modules/backend-live-demo.gitInstallation of Magnolia with Magnolia CLI
If you do not currently have the Magnolia CLI package installed, in the terminal, run:
npm install -g @magnolia/cliIn a terminal, navigate to the backend-live-demo/magnolia directory (in the git repository) and run:
mgnl jumpstartChoose magnolia-community-demo-webapp or magnolia-dx-core-demo-webapp as the version to download.
Replace Javascript Models 1.2
To make your life just a little easier, we have created a script that you can use to upgrade to Javascript Models 2 and install the Backend Live modules. If you wish to do this manually, you can skip this step and jump to Manual Upgrade.
Otherwise, you can perform an upgrade by simply running (from within the backend-live-demo/magnolia directory):
cd ./backend-live-demo/magnolia/scripts
npm start
Manual Upgrade
| Javascript Models is currently in Beta, and version 1.2 comes bundled with Magnolia. You will need to remove this, and add the following: |
Remove ./magnolia/apache-tomcat/webapps/magnoliaAuthor/WEB-INF/lib/magnolia-module-javascript-models-1.2.0.jar
Add the following to ./magnolia/apache-tomcat/webapps/magnoliaAuthor/WEB-INF/lib/
Start Magnolia
From within the magnolia directory, start Magnolia by running:
mgnl startOnce the terminal shows Server startup in X ms
In your browser, open Magnolia at: http://localhost:8080/magnoliaAuthor.
You can now jump to The Use Case.
Installation of Magnolia using Maven
Expand for details
You can use our example webapp project found at the https://git.magnolia-cms.com/users/srhodes/repos/backend-live-demo-webapp/browse or you can add the following dependencies to your parent/webapp project:
<project>
    ...
    <dependencyManagement>
        ...
        <dependency>
          <groupId>info.magnolia.javascript-models</groupId>
          <artifactId>magnolia-module-javascript-models</artifactId>
          <version>2.0-beta1</version>
        </dependency>

        <dependency>
            <artifactId>backend-live-actions</artifactId>
            <groupId>info.magnolia.backendlive</groupId>
            <version>1</version>
        </dependency>

        <dependency>
            <artifactId>backend-live-ui</artifactId>
            <groupId>info.magnolia.backendlive</groupId>
            <version>1</version>
        </dependency>

        <dependency>
            <artifactId>backend-live-availability</artifactId>
            <groupId>info.magnolia.backendlive</groupId>
            <version>1</version>
        </dependency>
    </dependencyManagement>
</project>
Until Javascript Models 2 is part of the main Magnolia bundle distribution, you will need to exclude the default version in your webapp’s POM with:
<project>
    ...
    <dependencies>
        ...
        <dependency>
          <groupId>info.magnolia.dx</groupId>
          <artifactId>magnolia-dx-core-webapp</artifactId>
          <type>war</type>
          <exclusions>
            <exclusion>
              <groupId>info.magnolia.javascript-models</groupId>
              <artifactId>magnolia-module-javascript-models</artifactId>
            </exclusion>
          </exclusions>
        </dependency>
    </dependencies>
</project>
It is useful to include our Magnolia Travel Demo code, but this is totally optional.Here are the dependencies you’d need to add to your webapp POM for our demo:
<project>
    ...
    <dependencies>
        ...
        <!-- Travel Demo -->
        <dependency>
          <groupId>info.magnolia.demo</groupId>
          <artifactId>magnolia-travel-demo</artifactId>
        </dependency>
        <dependency>
          <groupId>info.magnolia.demo</groupId>
          <artifactId>magnolia-travel-tours</artifactId>
        </dependency>
        <dependency>
          <groupId>info.magnolia.eedemo</groupId>
          <artifactId>magnolia-travel-demo-marketing-tags</artifactId>
        </dependency>
        <dependency>
          <groupId>info.magnolia.eedemo</groupId>
          <artifactId>magnolia-travel-demo-personalization</artifactId>
        </dependency>
        <dependency>
          <groupId>info.magnolia.eedemo</groupId>
          <artifactId>magnolia-travel-demo-component-personalization</artifactId>
        </dependency>
        <dependency>
          <groupId>info.magnolia.eedemo</groupId>
          <artifactId>magnolia-travel-demo-multisite</artifactId>
        </dependency>

        <!-- Contacts for JS Models Samples -->
        <dependency>
          <groupId>info.magnolia.contacts</groupId>
          <artifactId>magnolia-contacts</artifactId>
        </dependency>
    </dependencies>
</project>| the versions above are relying on: |
    <dependency>
      <groupId>info.magnolia.dx</groupId>
      <artifactId>magnolia-dx-core-webapp</artifactId>
      <type>pom</type>
    </dependency>
You will now want to make sure to use the light-modules directory of this project rather than the default location.You can use JVM arguments to accomplish this.I will also include a JVM argument for the location of your JCR Repository as the default location will be destroyed every time you run mvn clean
-Dmagnolia.repositories.home=/${YOUR-LOCAL-PATH}/repositories
-Dmagnolia.resources.dir=/${YOUR-LOCAL-PATH}/light-modules
Make sure to replace ${YOUR-LOCAL-PATH} with the actual path on your filesystem.
|
If you wish to use a more modern JVM (like Java 17), you will also need to add one other JVM argument:
--add-opens java.base/java.lang=ALL-UNNAMEDYou are ready to deploy your webapp using your IDE.To keep the documentation consistent using either the mgnl jumpstarthttp://localhost:8080/magnoliaAuthor/
The Use Case
Content Editors would like to be able to visualize a property called locked on only specific types of pages. Rather than the default Boolean true or false, they’d like to represent the value by showing an icon of a locked symbol when this value is true, and nothing at all when false. They would also like to have a custom action in the Action Bar that would allow them to switch a locked page to an unlocked page, and vice versa.
Let’s capture the necessary functionality to fulfill this use case. We need the following:
-
A custom Column Definition to show a locked icon or nothing at all.


-
A custom Action Definition to toggle the boolean
lockedproperty when clicked. This results in two actions, both using the same Action Definition.Green and Red Arrows pointing to the new Action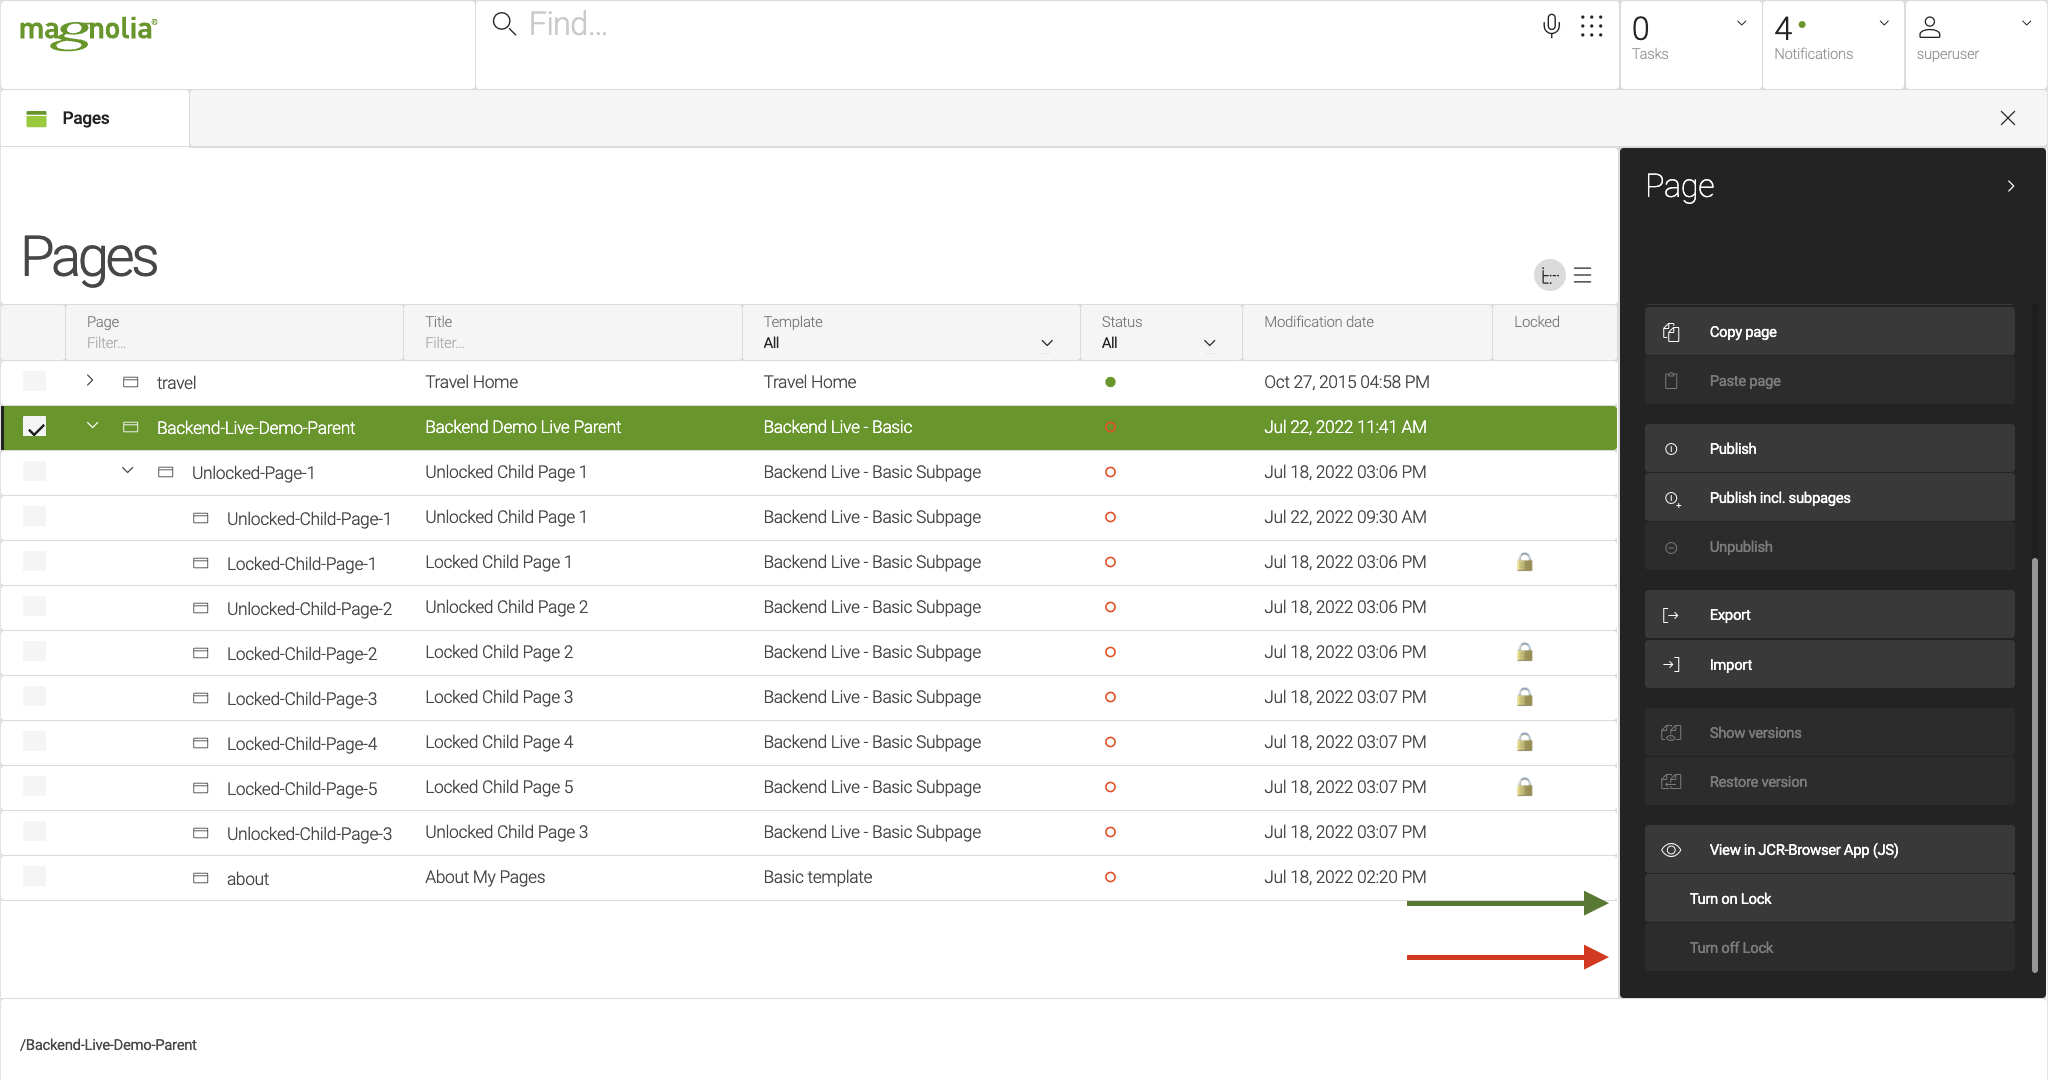
-
A custom Availability Rule Definition to only show this value if a Page Template is of specified types.


-
A custom Availability Rule Definition to only allow the "Unlock" action when the value is
trueand only allow the "Lock" action when the value is false.

If we were to do this without the use of Javascript Models 2, it would require, at minimum, 6 Java classes and dozens of timely re-deployments. Now, we can accomplish all of this with a few Javascript objects, and zero re-deployments.
Run Demo
Let’s see this thing in action. Now that you’ve got a running instance of Magnolia, all that we need to do now is import our sample page. There is an import file contained within our checked out repo, which you can find at backend-live-demo/magnolia/_dev/content-to-import/website.Backend-Live-Demo-Parent.yaml. Simply open the Pages App: http://localhost:8080/magnoliaAuthor/.magnolia/admincentral#app:pages-app:browser, make sure you haven’t selected any pages in the browser, then click "Import" in the Action Bar. Drag the yaml file into the "Upload" field, then click "Import".
For details and to get hands-on experience, follow the Tutorial below.
Tutorial
As mentioned at the beginning of this page, if you’d like to follow along with this tutorial, you’ll want to check out the start branch. With a terminal open in this repository, run the following:
git checkout startBefore we begin, let’s verify that your system is properly configured to work with Javascript Models 2 and the Backend-Live extensions. We have prepared an example Action that will be available on the Pages App and the JCR Browser App. If everything is working, you should be able to open the Pages App, and click on the travel page is the workbench. You should see an action in the Action Bar labeled: "View in JCR-Browser App (JS)". If you click this, you should be redirected to the JCR Browser with the travel page selected. If so, success!
Overview of the start Project
Ignoring backend-live-actions for now, this just contains the above verification code.
|
├── magnolia
│   ├── _dev
│   │   └── content-to-import
│   │       └── website.Backend-Live-Demo-Parent.yaml
│   └── light-modules
│       └── backend-live-demo-lm
│           ├── decorations
│           │   └── pages-app
│           │       └── apps
│           │           └── pages-app.yaml
│           ├── dialogs
│           │   └── pages
│           │       └── page.yaml
│           ├── templates
│           │   └── pages
│           │       ├── basic-subpage.yaml
│           │       ├── basic.ftl
│           │       └── basic.yaml
│           ├── backendScripts
│ └── module.yaml-
In
magnolia/_dev/content-to-import, we have the page structure we will import. -
With
magnolia/light-modules/backend-live-demo-lm/decorations/pages-app/apps/pages-app.yaml, we add the column for the propertylockedto the Pages App. -
In
magnolia/light-modules/backend-live-demo-lm/templates/pages, we have two bare-bones pages templates that will have thelockedproperty available. -
The
magnolia/light-modules/backend-live-demo-lm/backendScriptsfolder is where we will store our javascript files to. -
The
magnolia/light-modules/backend-live-demo-lm/module.yamlis our Light Module descriptor declaring that we rely on Javascript Models 2.
Now we are ready for Step 1. If you need some help, you can use Git to compare the start branch to the step1 branch.
Step 1 - Add a custom Column Definition
For your convenience, we have provided an import file to create the page structure that we’ll be working from. The first thing we need to do is import that file.
-
Open the Pages App.
-
Make sure that no page is selected in the workbench.
-
Click "Import"
-
Drag the file
magnolia/_dev/content-to-import/website.Backend-Live-Demo-Parent.yamlinto the Import Dialog.
If you expand the page tree, you should see that you have a locked column populated by true and false. What we want is to see a 🔒 icon when this value is true and nothing when it is false.
Let’s make sure we use Magnolia’s Best Practices and do proper Dependency Management. The module that we will be depending on in order to add a custom Column Definition is backend-live-ui Version 1.0 and higher. Open magnolia/light-modules/backend-live-demo-lm/module.yaml and add this dependency to the dependencies property like this:
dependencies:
  ...
  backend-live-ui:
    version: 1.0/*
By using the backend-live-ui, all we need to do is create a new Column Definition is to add our Javascript file, define the function apply within our new object that will be returning some HTML, then wire it up in the YAML definition. So let’s do that now.
We will create our Javascript resources within the backendScripts folder. It isn’t required that you place your Backend Javascript files here, but it is highly suggested that we all follow some standard best-practices. The file will be called: backend-live-demo-lm/backendScripts/valueProviders/booleanIcon.js and override the apply method. Here’s how your skeleton-code should look:
var BooleanIcon = function () {
    this.apply = function(item) {
        this.log.info("You have applied a Column Definition.");
        return "TODO";
    }
}

new BooleanIcon();
When declaring the function BooleanIcon, you must declare it as a var, and not a const. Within the function logic, you are free to use const and let.
|
Always make sure to declare a new instantiation of your class so that GraalVM can invoke your methods.
|
Now we can use this custom Column in our pages-app.yaml decorator. Of course, this will just print TODO, as you can see in the return statement, but at least we can wire this thing up. To do this, open the decorator magnolia/light-modules/backend-live-demo-lm/decorations/pages-app/apps/pages-app.yaml and modify the locked column property like this:
subApps:
  browser:
    workbench:
      contentViews:
        tree:
          columns:
            locked:
              $type: jsColumn
              label: Locked
              width: 100
              modelPath: /backend-live-demo-lm/backendScripts/valueProviders/booleanIcon.js
              parameters:
                trueImg: 🔒
Before we move on, let’s talk about what we just did. Fortunately, the structure of this definition will be the same for all other types of custom code we’ll be using today. We’ve added three new properties: $type, modelPath, and parameters. Here’s what each indicates:
-
$type: This is a custom Javascript Column Definition -
modelPath: This is the resource path to the Javascript Object that will be used -
parameters: This is a free-form way of passing parameters to the JS file that can be accessed withthis.parameters.my-param-name
At this point, we have provided the parameters, but if you recall our Javascript code, the only thing that will be accomplished at this point is a log message printed to the running Magnolia log, and the locked column will display "TODO". You can verify that this works by simply reloading the Pages app, and you should see many entries in the log file with our message. In our next step, we’ll add some business logic to make this Column Definition behave the way we really want.
Step 1.5 - The Implementation
To do something useful with our apply function, we’re going to follow these steps:
-
Make sure that the
itemwe’re dealing with is a JCR Node -
Get the property
lockedfrom theitem -
if the property is
true, then we check the parameters for atrueImgsetting, returning it if found -
if the property is
false, then we check the parameters for afalseImgsetting, returning it if found -
if none of our criteria has been met, then just return an empty string.
If you haven’t read up on the Javascript Models 2 documentation, we are going to be using cmsfn in the same way as we do with Rendering Models.
Here’s the code that will accomplish the steps mentioned above:
var BooleanIcon = function () {
    this.apply = function(item) {
        if (!item.isNode()) {
            return null;
        }

        const itemAsMap = cmsfn.asContentMap(item);
        const isLocked = itemAsMap ? itemAsMap['locked'] : undefined;

        if (isLocked) {
            if (this.parameters.containsKey('trueImg')) {
                return this.parameters['trueImg'];
            }
        } else if (this.parameters.containsKey('falseImg')) {
            return this.parameters['falseImg'];
        }

        return "";
    }
}

new BooleanIcon();
When using Templating Functions, such as cmsfn, it is critical that you perform null-safety checks with every call. Not doing so can result in an obscure PolyglotException.
|
Now, if you reload your Pages app, you should see those locked icons, or nothing at all. that wraps up Step 1. Just like before, in the next section, if you need to check the code, you can compare the step1 branch with the step2 branch.
Step 2 - Add a custom Action Definition
We will not fulfill part 2 of the use case: "A custom Action Definition to toggle the boolean locked property when clicked. This results in two actions, both using the same Action Definition."
We will now introduce another Backend Live module, backend-live-actions. Just like before, we should exercise best practices by adding it to our magnolia/light-modules/backend-live-demo-lm/module.yaml with the following:
dependencies:
  ...
  backend-live-actions:
    version: 1.0/*
Using backend-live-actions, all you need to do now is to create a Javascript object, write the execute business logic, wire-up the app’s YAML definition, and enjoy the fruits of your labor.
We will start by creating our Javascript resources within the backendScripts folder. The file will be called: backend-live-demo-lm/backendScripts/actions/changeValue.js and define the abstract execute method. Here’s how your skeleton-code should look:
var ChangeValue = function () {
    this.execute = function () {
        this.log.info("You just executed ChangeValue.");
    }
}

new ChangeValue();
We will start by wiring it up so that we can see if the log message appears when we click the button. We already have our backend-live-demo-lm/decorations/pages-app/apps/pages-app.yaml decorator, so let’s modify it to use this action. Here’s the YAML definition:
subApps:
  browser:
    workbench:
      ... # Just make sure you align the actions and actionbar with the previously defined workbench.
    actions:
      turnOnLock:
        label: Turn on Lock
        $type: jsAction
        modelPath: /backend-live-demo-lm/backendScripts/actions/changeValue.js
      turnOffLock:
        label: Turn off Lock
        $type: jsAction
        modelPath: /backend-live-demo-lm/backendScripts/actions/changeValue.js
    actionbar:
      sections:
        crud:
          groups:
            editingActions:
              items:
                turnOnLock:
                  name: turnOnLock
                turnOffLock:
                  name: turnOffLock
Open the Pages App and click on any page. You should see that there are two buttons, "Turn on Lock" and "Turn off Lock". If you click on either, you should see in the log file something similar to this:
2022-07-22 09:07:01,575 INFO gnolia.module.backendlive.actions.JavascriptAction: You just executed ChangeValue.It’s time to make this thing do something useful. What we would like to do is to change the property locked to true when "Turn on Lock" is clicked, and false when "Turn on Lock" is clicked. You could toggle the value, but that could make labeling this Action quite challenging, and would ruin an upcoming use case.
To accomplish this, we will be using the item.setProperty function for setting an Item’s property, and using YAML parameters to select the property name as well as the property value to change it to when clicked.
Now we can add the business logic to our ChangeValue object’s execute function with our Utility function:
var ChangeValue = function () {
    this.execute = function () {
        if (this.content.isNode()) {
            this.content.setProperty(this.parameters.propertyName, this.parameters.propertyValue);
            this.content.getSession().save();
        }
    }
}

new ChangeValue();
Last thing before we can test this is to modify our YAML definition by adding the parameters propertyName and propertyValue. Open the pages-app.yaml decorator once again, and modify the actions like this:
subApps:
  browser:
    actions:
      turnOnLock:
        ...
        parameters:
          propertyName: locked
          propertyValue: true
      turnOffLock:
        ...
        parameters:
          propertyName: locked
          propertyValue: false
Make sure to reload the Pages App for the changes to take effect. You should now be able to set the locked property to any page, and see the icon appear and disappear.
One issue, we don’t want to be able to just do that to any old page, so that’s the next step to resolve for our use case.
If you need some help in the next step, you can simply do a comparison between step2 and step3.
Step 3 - Add a custom Availability Rule Definition for Page Templates
As we will be introducing another module, the backend-live-availability extension, let’s modify our Module descriptor, backend-live-demo-lm/module.yaml dependency with the following:
dependencies:
  ...
  backend-live-availability:
    version: 1.0/*
Now, using backend-live-availability, all you need to do is to create a Javascript object, write the isAvailableFor business logic, wire-up the app’s YAML definition, and that’s it.
We will create our Javascript resources within the backendScripts folder. The file will be called: backend-live-demo-lm/backendScripts/rules/IsTemplate.js and define the abstract isAvailableFor method. Here’s how your skeleton-code should look:
var IsTemplate = function () {
    this.isAvailableFor = function (obj) {
        this.log.info("You just checked availability with IsTemplate.");
        return true;
    }
}
new IsTemplate();
We can test to see if this works by wiring up the YAML definition. As usual, we’re going to update the pages-app.yaml decorator by modifying the two previously configured actions. Here’s how we do that:
subApps:
  browser:
    actions:
      turnOnLock:
        ...
        availability:
          rules:
            isTemplate: &isTemplateRule
              $type: jsAvailability
              modelPath: /backend-live-demo-lm/backendScripts/rules/IsTemplate.js
      turnOffLock:
        ...
        availability:
          rules:
            isTemplate: *isTemplateRule
You can verify this works by reloading the Pages app. You should see in your log two messages similar to:
2022-07-22 10:35:47,038 INFO  ackendlive.availability.JavascriptAvailabilityRule: You just checked availabilty with IsTemplate.
2022-07-22 10:35:47,040 INFO  ackendlive.availability.JavascriptAvailabilityRule: You just checked availabilty with IsTemplate.
Let’s now modify the business logic for the isAvailableFor to do what we need it to do. We’ll use cmsfn.asContentMap once again, and simply check if a parameter contains the value of the template ID we wish this function to be available for. The parameter that we will create will be called templates and will simply be a Map of templates, which is why we use the containsValue method of Java’s List object. Here’s our modified class with the necessary logic:
var IsTemplate = function () {
    this.isAvailableFor = function (obj) {
        const nodeToCheck = cmsfn.asContentMap(obj);
        // Must use Null-Safety to make sure something is returned.
        const templateId = nodeToCheck ? nodeToCheck['mgnl:template'] : '';
        if (this.parameters.templates.containsValue(templateId)) {
            return true;
        }
        return false;
    }
}

new IsTemplate();| The generic parameters will not accept a List size greater than 1, so we use a Map instead. |
Last thing before testing is to add our parameter to the availability rule. That will simply look like this:
subApps:
  browser:
    actions:
      turnOnLock:
        ...
        availability:
          ...
          rules:
            isTemplate: &isTemplateRule
              ...
              parameters:
                templates:
                  basic: 'backend-live-demo-lm:pages/basic'
                  basicSubpage: 'backend-live-demo-lm:pages/basic-subpage'
If you refersh the Pages App once again, and click on the travel page, you should see that our two new actions are not available to that page, but if you click on "Backend-Live-Demo-Parent" or any of its child pages, those actions are available.
Now, it’s time for our "One more thing" moment. We’re going to complete this use case by adding another availability rule.
If you need some help in the next step, you can simply do a comparison between step3 and step4.
Step 4 - Add a custom Availability Rule Definition based on Property Value
Since we’ve already got everything working for backend-live-availability, we can get straight to work by creating our Javascript Object and add just a couple lines to the YAML definition.
We will first add a new Javascript class in our rules directory backend-live-demo-lm/backendScripts/rules/PropertyValueIsRule.js with this skeleton code:
var PropertyValueIsRule = function () {
    this.isAvailableFor = function (obj) {
        this.log.info("You just checked availability with PropertyValueIsRule.");
        return true;
    }
}

new PropertyValueIsRule();
Then we wire it up by adding the rule to our YAML definition in the pages-app.yaml decorator:
subApps:
  browser:
    actions:
      turnOnLock:
        ...
        availability:
          rules:
            ...
            isNotLocked:
              $type: jsAvailability
              modelPath: /backend-live-demo-lm/backendScripts/rules/PropertyValueIsRule.js
      turnOffLock:
        ...
        availability:
          rules:
            ...
            isLocked:
              $type: jsAvailability
              modelPath: /backend-live-demo-lm/backendScripts/rules/PropertyValueIsRule.js
You can test by reloading the Pages App, and clicking on a page in the browser. You should see two lines in the log file similar to:
2022-07-22 11:36:31,861 INFO  ackendlive.availability.JavascriptAvailabilityRule: You just checked availability with PropertyValueIsRule.
2022-07-22 11:36:31,865 INFO  ackendlive.availability.JavascriptAvailabilityRule: You just checked availability with PropertyValueIsRule.
Now we add the business logic to simply compare what we expect the value to be, reusing our Utility getItemProperty function like this:
var PropertyValueIsRule = function () {
    this.isAvailableFor = function (obj) {
        const itemAsMap = cmsfn.asContentMap(obj);
        // Remember, null-safety.
        const existingValue = itemAsMap ? itemAsMap[this.parameters.propertyName] : undefined;
        if (existingValue === undefined || existingValue === this.parameters.propertyValue) {
            return true;
        }
        return false;
    }
}

new PropertyValueIsRule();
As you see, we need to set to parameters in the YAML definition for propertyName and propertyValue. Let’s modify the availability definitions like this:
subApps:
  browser:
    actions:
      turnOnLock:
        ...
        availability:
          rules:
            ...
            isNotLocked:
              ...
              parameters:
                propertyName: locked
                propertyValue: false
      turnOffLock:
        ...
        availability:
          rules:
            ...
            isLocked:
              ...
              parameters:
                propertyName: locked
                propertyValue: true
One last reload of our Pages app, and you should see that only "Unlocked" pages allow you to click "Turn on Lock" and "Locked" pages allow you to "Turn off Lock".
Congratulations, you’ve finished the tutorial!
If you are a frontend developer, I hope you’ve gotten a taste of how much customisation is now available to you with Backend Live.
If you are a backend developer, I hope you’ve seen how much time and effort can be saved with Backend Live. No JAR deployments necessary